Today I would like to show you how to make 4 cards using one 6″ x 6″ piece of Designer Series Paper. It’s a great way maximize your paper supply or an easy way to make up bulk cards as well.

For this card, I used the PARTY PUFFINS Stamp set which can be found in the May 2021-April 2021 Annual Catalogue. These cute little Puffins just scream personality don’t you think?
They also pair really well with the PENGUIN PALACE Stamp and Punch bundle. There is even matching PENGUIN PLAYMATES Designer Series Paper which is just one of many choices of FREE products you can choose with any $60.00 or $120.00 purchase during Sale-a-bration. Sale-a-bration lasts only until Sept 30 and then it’s over until next year so don’t delay, shop today! To shop or see more details, just click on the link to visit my ONLINE STORE. Don’t forget to use my September Host Code FWGF4ES4 when making purchases and you will receive a free gift from me as well as a thank you card.

TO MAKE THIS CARD
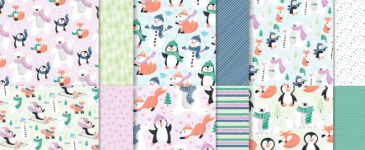
I chose the PATTERN PARTY Designer series paper for this design. This paper is available as a host product that includes 48 sheets of 12″ x 12″ paper. This is only available with Stampin’ Rewards with every qualifying order of $375.00 or more. So get some friends or family together to place a single order to qualify.
I cut a square at 6″ x 6″. As you can see in the pictures below, I lined up one corner at the 1 1/2″ mark at the top of my paper trimmer than positioned the bottom corner at the 1 1/2″ mark along the edge of my paper trimmer. After cutting the paper I turned my paper around and carefully positioned the two pieces in the same position and cut again. This gave me four unique pieces to make my cards.
TIP: Cut two squares of double sided paper and use both sides of the paper for even more card layouts.
OPTION: Mark you paper at the 1 1/2″ at each corner and draw a pencil line from corner to corner before cutting. Don’t forget to erase the lines afterwards.


If you want to mat each piece, you can cut out the card stock the same way. However, I choose to save some time. I took a 6 1/2″ x 6 1/2″ piece of Basic Black Card Stock to mat the pieces. Instead of cutting out the pieces separately, I decided to attach the DSP to the card stock then cut each piece out. You can see in the picture, the DSP is not perfectly aligned so be very careful when cutting this way. You now have four matted pieces of DSP

To make up my cards, I took four card bases in Basic White and then played around with the DSP pieces until I was happy with their positions. I then attached them to my card fronts so each card is a little different.
TIP: Be aware of directional patterns when placing your pieces
I then cut out my circles in Basic White and Basic Black. After stamping the adorable puffins, I glued them to the black circle at an offset, and popped them up with Dimensional’s on the card front.
To finish my cards. I stamped my greetings in Real Red then stamped the candles and cake around the cards. After colouring them with various blender pens, I added a few embellishments to just add to the fun.
Now I love how fun the cards above look and they would be perfect cards for young or the young at heart. However, they aren’t for everybody. Just by changing up the Designer Series paper, will completely change the look of your cards.
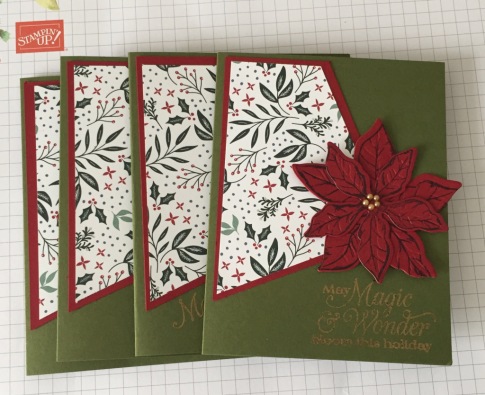
I am currently making some Christmas cards using the same method and thought I would share how they look (so far) just for a different perspective.
With these cards, I used the TIDINGS OF CHRISTMAS Designer Series Paper and positioned the DSP in the same spot on all four cards. I then stamped and heat embossed the sentiments in gold. To finish off my cards, I plan to add some foliage in red, green and gold, behind the Poinsettia’s to fill it in a bit.
I also plan to colour the flowers with Wink of Stella to make it sparkle and maybe add some bling to embellish the card fronts.
So what do you think? If you give it a try, I would love to see pictures of your cards.

I love being a Stampin’ Up! Demonstrator. I have been offered so many opportunities which would not have been available if I hadn’t become a demonstrator. One opportunity is the Stamping “Family” and the fellowship it offers.
Within that family, you have exclusive access to plenty of additional resources, stamping techniques and demonstrator discounts of 20% or more! We all love discounts right?
I am currently welcoming new team members to my team of “Canadian Stampers” and I would love to have you join my team. Just click on the link JOIN MY TEAM Purchase your starter kit for $135 and start shopping. Choose $165 worth of products OF YOUR CHOICE! As added FREEBIES, during Sale-a-bration you can also to choose ANY BUNDLE (there are 12 to choose from) from the July–December 2021 Mini Catalog FOR FREE! Sale-a-bration ends Sept 30 and won’t return until next year, so don’t wait!
There couldn’t be a better time to join the Stampin’ Up! family.
You will also receive a free Business Supplies Pack which allows you the opportunity to progress your hobby into a business at any point you choose (or not!). From the moment that you finish signing up and purchasing your Starter Kit you will realise that you get more than just the items in your box.
If you want to see future posts, I invite you to like and follow my blog so you won’t miss out. If you would like to be added to my email newsletter, please provide your contact information here. I provide monthly emails with all the latest updates so you won’t miss out.
Until next time, happy crafting!
Sue


