[vc_row][vc_column][vc_column_text woodmart_inline=”no” text_larger=”no”]
Today I want to step back and share some crafting basics with you. Whether you are a true beginner, an avid crafter or somewhere in between, it’s always a good thing to step back and take a look at what you are doing. The old saying “Measure Twice and Cut Once” holds true fo many things, including crafting. Whether you are making cards, gift bags, boxes, tags or scrap book pages, no one wants to mess up a measurement and start over.
How to Use a imperial Ruler – Inches
So today, I want to share some basics with you and we will start with the ruler. Below is a diagram, showing the breakdown of an Imperial ruler. These markings represents the fractions of an inch. For clarity, the markings shown are just from 0 to the 1” mark
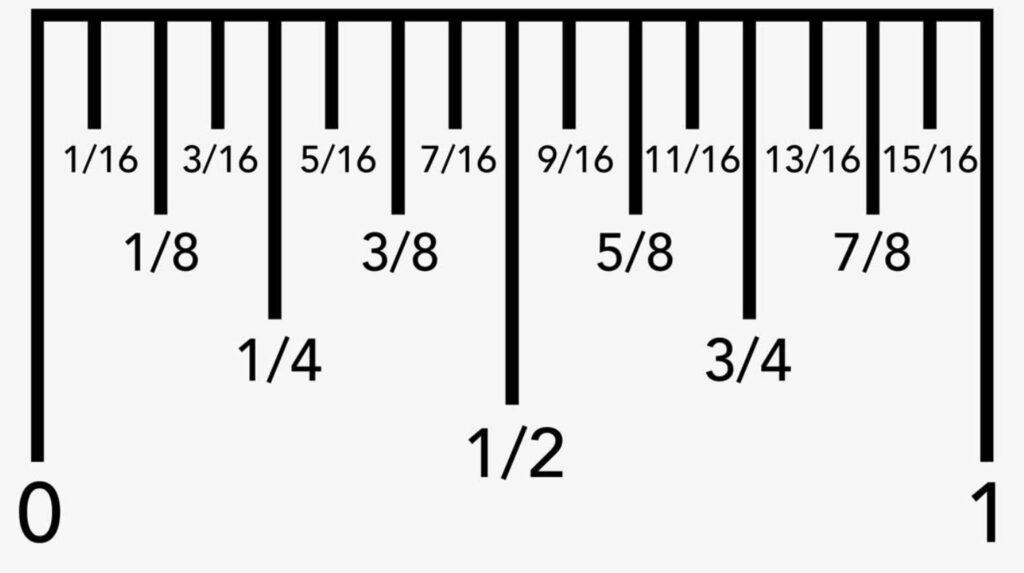
The larger vertical lines measure 1/4″, 1/2″ and 3/4″ which are the most common measurements used. The medium vertical lines measure 1/8”, 3/8” 5/8” and 7/8” and these measurements are also very popular measurements used in cards and crafting. The smallest vertical lines break it down by /16” and the easiest way to measure this is to just count all the vertical ticks shown. i.e. 5/16″ would be 5 vertical ticks.
When your measurements are over the 1” mark, the same thing applies. Simply use the number on the ruler and add the fraction. For example, to measure 3 1/8”, just count two ticks past the number 3 measurement on the ruler.
How to Use a Metric Ruler – Centimetres
It can be confusing to see a project with metric measurements when you are use to using Imperial measurements, especially when you want to convert to Metric. So I am including a breakdown of metric rulers as well. Metric rulers have both Centimetre and Millimetre markings and are often found on the other edge of an Imperial ruler. The larger markings on the ruler represent a centimetre while the smaller ticks on a metric ruler represent a millimetre.
There are 10 millimeters in a centimeter, so there are 9 millimeter ticks between each centimeter tick.
Basic Crafting Tools
Like any hobby or crafting project, you need the necessary tools to do the job. Below are a list of tools that I cannot live without. There are others, but these are my basic go-to’s when paper crafting. Obviously in order to paper craft, you need paper, ink pads, stamps, etc but you also need some basic tools to create your projects. Here are a list of my favourites and I would recommend you have these on hand. It will make creating so much easier.
PAPER TRIMMER – This tool is used to cut and score paper for card making, scrapbooking, and other paper crafts. The extra-wide cutting base and extendable ruler up to 17″ accommodates large paper projects. The base of the paper trimmer includes both imperial and metric measurements
BONE FOLDER – I use this tool to easily score or to make crisp folds on paper and card stock. Scores, burnishes, and distresses paper
PAPER SNIPS – These sharp little scissors have a pointed tip for expert cutting even in small areas. The precision-ground stainless steel tips cut cleanly all the way to the end of the blades which is perfect when you want to fussy cut an image.
CLEAR BLOCKS – Stamp blocks are grooved for easy gripping and clear so you can see right where you’re stamping. They come in 9 different sizes to accommodate stamps of all sizes and you can easily reuse these over and over again.
SILICONE CRAFT SHEET – This mat has many uses but is mostly used for adding adhesive and avoiding messes. Excess glue can just be pealed away or washed off. It’s translucent too, so it perfect to use for reverse stamping.
SIMPLY SHAMMY – This reusable stamp cleaning cloth makes cleaning stamps effortless. Just add water to wet it down, then wipe stamps for easy clean up. to clean just rinse it out and reuse. If it dries out just wet it again and reuse.
TAKE YOUR PICK TOOL – This is a multipurpose pickup and precision tool to simplify meticulous tasks. The tacky putty end easily picks up sequins, paper accents, and other small objects. It also has numerous tip attachments available. Each tip can be easily replaced with another tip with just a twist as needed.
GRID PAPER – Although not really necessary, I always have some on hand. This paper is a great way to protect your work surface. It is 11″ x 17″ inside and comes with a built in ruler along one side and bottom of the paper. The grid lines make it perfect for lining up your paper too.
CUTTING & EMBOSSING MACHINE – This machine makes crafting easy. You can use it with dies and embossing folders to easily create accents and elements for cards, scrapbook pages and any crafting projects you like.
Visit my ONLINE STORE at any time, 24/7, to see all the amazing products or to purchase supplies.
Before your close your order, don’t forget to add my current Host Code – WVK4ZJFD Everyone who places an order with me using the host code, will receive a thank you card & gift in appreciation.
If your order is over $200, DO NOT use the host code as you will earn your own Stampin’ Up! rewards with your order. You will still receive a thank you card and gift from me.
You can place your order directly online. However, if you are not comfortable placing orders online, I will be happy to place an order for you. Please contact me at susanbeale@canadianstamper.ca to discuss.
[/vc_column_text][/vc_column][/vc_row][vc_row][vc_column][html_block id=”11646″][/vc_column][/vc_row]
Leave a Reply