[vc_row][vc_column][vc_column_text]With Valentine’s Day approaching I wanted to make my hubby a card. He really likes the fancy or fun fold cards I make so decided to make one for him. I decided to use the adorable Bee Mine suite of products to make up a tunnel card. From the outside it looks like a regular card but the tunnel card allows a fun 3D effect on the card when you open it.
To make this card, it will be done in too parts. For clarity I will call them the Tunnel piece and the Card Base piece
Tunnel Piece
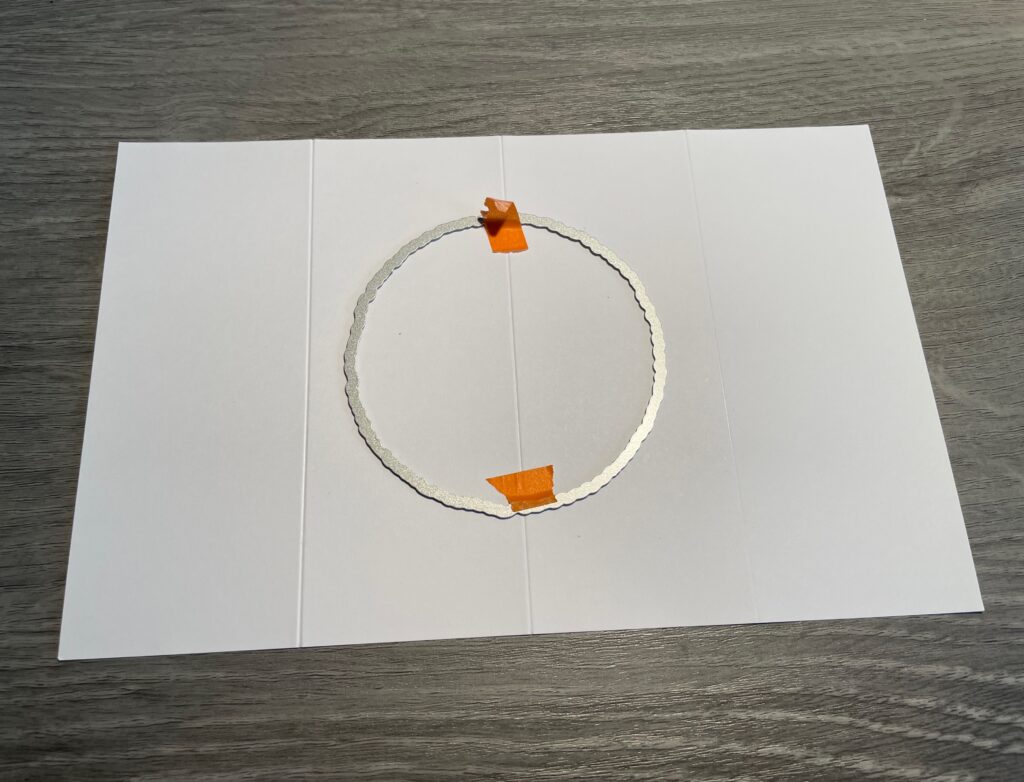
Make a small pencil mark at 4 1⁄4” at both the top and bottom of the long side of the card stock. Align the center of the circle die with the 4 1/4′′ mark, making sure it is centered from top to bottom of the card as well.
By doing this first, you can save the cut out for the front of the card and there won’t be a score line down the middle. (I forgot to do this so my picture shows a score line down the middle)
Place a post it or sticky note to hold it in place then die cut out the circle using your cutting and embossing machine.
You can now score the tunnel piece at 2 1/8”, 4 1⁄4” (carefully) and 6 3/8” on the long side of one piece of the Basic White card stock.
Optional: I used a circle die but you can use an oval or even a square die if you prefer.
Once you have scored your card stock, fold your paper as follows;
2 1/8” is a valley fold,
4 1⁄4” is a mountain fold and the
6 3/8” is a valley fold.
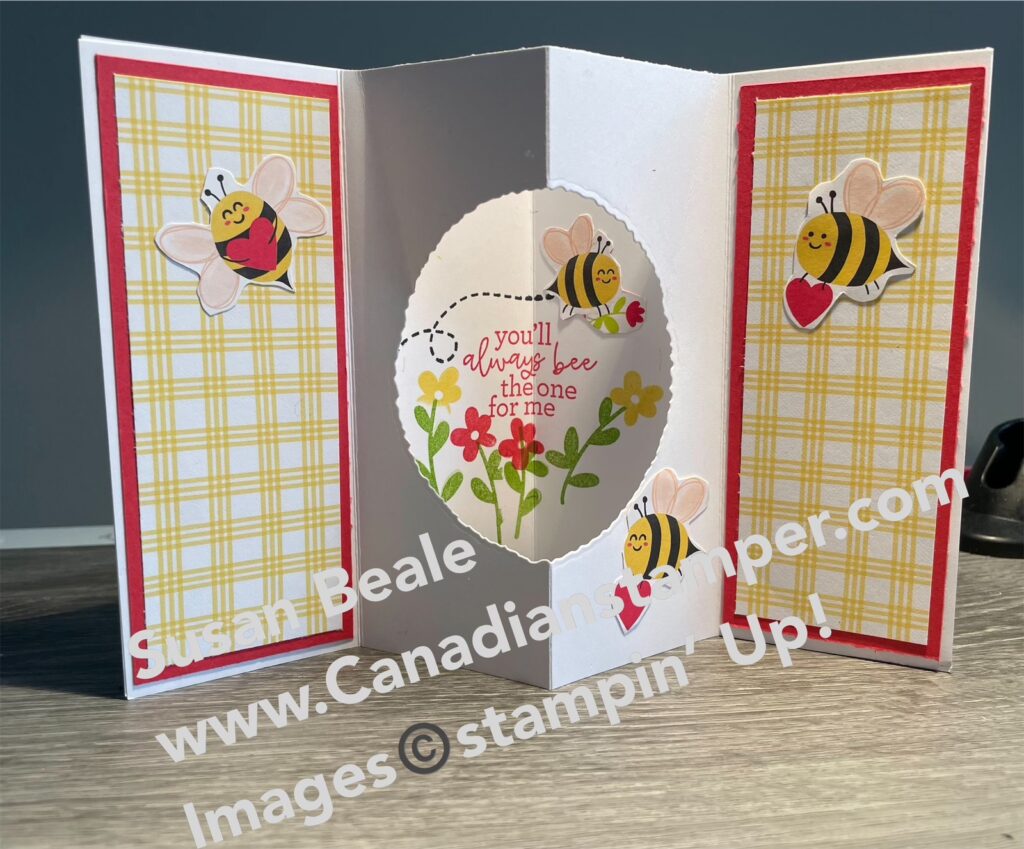
Crease well with your bone folder. You can see how the opening becomes your tunnel

Adhere the two pieces of Sweet Sorbet to the side panels, then adhere the two DSP panels as well
Card Base piece
DO NOT FOLD YOUR CARD BASE
Lay your tunnel piece flat, over the top of the card base to visualize where you will stamp. Make a very small pencil mark on the inside of the circle at the top and bottom and on the sides for reference. Remove the tunnel piece and set aside for now.
Stamp your greeting in the center between the pencil marks. Add additional stamps to decorate around the circle and your greeting. I used the cute flowers that are part of the stamp set . To check how you are doing, just lay your tunnel piece over the card base to make sure it lies in the middle. When you are happy with your design, score the card stock at 4 1⁄4” on the long side. Fold and crease with your bone folder. Remove any pencil marks you have made on both papers
You can now add the tunnel piece. Add adhesive to the back of the two outer panels and lie the tunnel piece flat onto to the card base, making sure all the outside edges are lined up. Fold up and give it a good crease, it will be a bit bulky.
Fuzzy cut three bees from the designer series paper and adhere the bees flat around the tunnel opening so you are not adding any additional bulk to the card
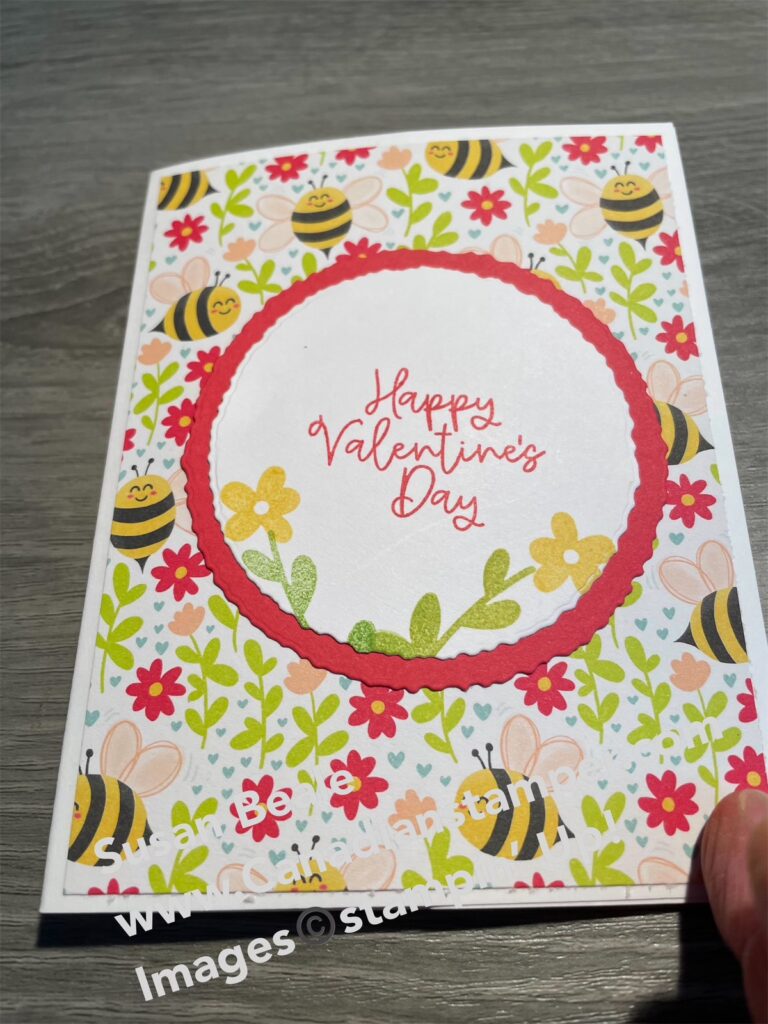
For the front of the card, adhere a piece of DSP to the front. For my greeting I cut two deckled circles, one in Basic White (remember I scored my tunnel piece too soon and could not use the cut out) and the other in Sweet Sorbet.
I stamped my greeting and a few flowers. before adhering to the card front. Due to the bulk of this card, I did not use dimensional’s.
The tunnel card is fast and easy to make yet looks like you put a lot of time and effort into making this card so I hope you will give it a try.
Below are the products I used to create this card. Visit my ONLINE STORE at any time, to see all the amazing products or to purchase supplies. Before you close your order, don’t forget to add my current Host Code –9KSAZCJ2 if your order is less then $200.00. Everyone who places an order with me using the host code, will receive a thank you card & gift in appreciation.
If your order is over $200, DO NOT use the host code since you will earn your own Stampin’ Up! rewards with your order. You will still receive a thank you card and gift from me in appreciation.
You can place your order directly online at any time. However, if you are not comfortable placing orders online, I will be happy to place an order for you. Please contact me at susanbeale@canadianstamper.ca to discuss.
Product List


")


Be inspired by the beauty of nature with the March Memorable Meadows Paper Pumpkin Kit.
You can send elegant thank you, birthday, or thinking of you cards to friends and family all year long!
This kit perfectly coordinates with the Meandering Meadows Suite Collection (item 162745), which you can shop for in the Online Exclusives while supplies last.
Plus, each March subscription kit includes a FREE gift—an additional photopolymer stamp set that can be used with the kit and all your crafting projects!
Subscribe by 10 March to get all this all-inclusive kit by CLICKING HERE.
Subscribers can also shop the exclusive The Love of Spring Dies Add-On, which coordinates with January, February, and March kits. Make sure you shop the add-on early because it’s only available while supplies last!
[/vc_column_text][/vc_column][/vc_row][vc_row][vc_column][html_block id=”11646″][/vc_column][/vc_row]
Leave a Reply