Sometimes you just want to send a card to say hello or write a short note and let them know you are thinking of them. Other times, a Thank You card is appreciated. I recently made up these lovely cards which are blank inside so messages can be added as needed.
However, I also wanted to create a gift box to put them in. I think this will make a lovely gift for someone who is housebound, a hostess gift or a just thinking of you gift. Who ever you give it to will appreciate it.

I made up these pretty cards using the DAINTY FLOWERS designer Series paper which is free with any $60 purchase during Sale-a-bration.
This promotion doesn’t end until Feb 28th so you still have time to take advantage of this sale.
My greeting came from the GO TO GREETINGS stamp set. I love this stamp set because it includes 13 different stamps. These stamps have different sizes and fonts of your most favourite stamped greetings—Thinking of You, Just a Note, Thank You, and Happy Birthday. There is even a small stamp that just says Hello!
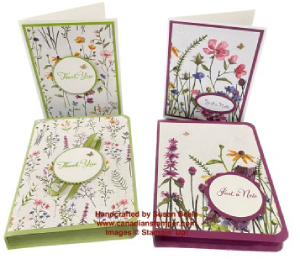
So with my cards completed, my next step is to create a lovely box to put them in. As you can see, I actually made up two sets of cards and gift boxes using this lovely paper.

This gift box which is 4 ½” wide and 6” high and approximately ¾” deep, looks like a book when closed.
However when you open it. there is a pocket to hold notes or stamps on the left and a box to hold 4 cards and envelopes on the right.
This box could also be used to hold some goodies and the box is held closed with a small hidden magnet.
I also rounded the corners so it looks more like a book but this is optional. It will look great either way
There are several steps in making this gift box so let’s start with the supplies first.
SUPPLIES REQUIRED
Granny Apple Green Card stock
- Outside bookcover – 10 3/8” x 6 ½”
- Inside box – 8” x 7 ½”
- Scrap card stock for greeting
Dainty Flowers Designer Series Paper
- Front Cover – 4 ½” x 6 ¼”
- Inside box front – 1 ¾” x 5 ¾”
- The Inside Pocket – 10 ½” x 5 ½”
Basic White
- Scrap card stock for greeting
Punches used for my greeting were the 2″ circle punch and the starburst punch (both retired) but you could use any dies or punches you like.
Ok, let’s get started.
TO CREATE THE BOOK COVER
- On the 10 3/8″ side, score at 4 ¾” from each end.
- Fold and burnish score lines
- Lay the cover open
- At this point, if you want to have a ribbon closure, glue down the ribbon across the middle of the cover on the inside now, leaving enough ribbon on both ends to tie your bow closure when your book is closed
- Set aside for now
- OPTIONAL –
- Round the four corners if desired. I love how it makes it look more like a book, but it’s not necessary.
TO MAKE THE BOX FOR THE INSIDE
- On the 8″ side of the paper, score at ¾” 5 ¼” and 6”
- Turn the paper to the 7” side and score at ¾” on both sides
- Fold and burnish all the score lines.
- Cut the two corner flaps on the ¾” score line and wedge the flap leaving the center portion straight with a straight edge.
- Turn your paper and cut up the two middle score lines to create the two middle flaps, again wedging slightly on both the top and bottom.
- Adhere the ¾” flaps and fold inside to begin creating your box.
- Fold in the two remaining flaps on either side and add adhesive (it’s easier to to it all as once)
- Fold in the middle flaps and adhere to the box sides then tuck in the larger flaps and adhere to the box sides, making sure to square up the corners
- Set aside for now
As you can see in the pictures below how it is scored, then cut and the finished box.
Note: I didn’t realize when I took the middle picture that it is actually flipped around from the other two pictures.


TO MAKE UP THE INSIDE POCKET
- Score on the 10 1/2″ side at 6 ¼” and 9 ¾”
- Turn your paper to the 5 ½” side and score at ½” on both sides of the paper
- Along the 6 1/4″ section, cut away the ½” side on both sides making sure to cut off the score line
- Cut a small wedge on the remaining flap
- Arrange your paper so it looks like an upside down “T” with the patterned paper you want to show facing up.
- Fold up the bottom part up, along the score line
- Fold down the top portion down towards you to create a lip. (the patterned paper you want to see is showing)
- Add glue to the two small squares of the flaps on either side and glue down the lip.
- DO NOT glue down the lip on the front of the pocket. This is where you will hide the magnet
- Fold and burnish the two outside flaps then fold them around to the back and glue down to create your pocket.
- Round the two outside corners (left side) if you rounded the corners of the cover.


TO PUT IT ALL TOGETHER.
- With the book cover open and lying flat
- Glue down the pocket on the left hand side and placing it just to the left of the score line
- Add glue to the back of the box and the left side of the box. Press the box down so it is just to the right of the score line.
- Turn the cover sideways and press the side of the box so it is right against the middle binder. Hold in place for a few minutes to firmly adhere it.
- To add the magnet closure, place a glue dot on the magnet and tuck it under the inside of the pocket lip so it lies about 3/4” to 1” from the edge of the pocket and press gently to adhere. This way it is hidden from view.
- Place the second magnet on top of the lip and add a glue dot. Close your book to glue down the magnet on the right hand side and gently press down to secure. This way the magnets align when the book is closed.
- To hide the magnet, glue the box front designer series box over the magnet and press down gently.
- Close your book and adhere the front cover paper to the front of your book.
- If using the ribbon closure, tie in a bow to hold your box closed.


As you can see, I decorated the front of my gift box in a similar way as the cards showing inside. I left the front of the inside pocket blank but you could easily add a secondary greeting to the front of the pocket if desired. The pocket is a perfect place to tuck in some stamps or a note or even a gift card.


And there you have it? Four cards and a lovely box to hold them all in. The front is an easy way to show you which cards are inside.

If you would like to receive some lovely designer series paper FREE, Don’t wait! Place your order before Sale-a-bration ends on Feb 28th!
For every $60.00 order you place (before tax and shipping)
- You choose 1 (level 1) product FREE from the SAB brochure.
For every $120.00 order you place (before tax and shipping)
- You choose 1 (level 2) product FREE from the SAB brochure
- OR
- you can choose 2 (level 1) products FREE from the SAB brochure.
SHOP WITH ME to visit my online store and see and the amazing products
Before you complete your order, please add my Host Code 3SAKGRM9 if your order us under $200.00 If your order is over $200, DO NOT use the host code as you will earn your own Stampin’ Up! rewards. Everyone who orders from me, will receive a thank you gift and card in appreciation of your business.
Here is just one example of making the most of this promotion.
Purchase the Fragrant Flowers Bundle (item 160460) on page 21 of the mini catalogue for $67.50, then choose the coordinating Favoured Flowers 12″x 12″ designer series paper for FREE from the SAB brochure.
NOTE: When shopping, take note of your shopping totals. You don’t want to miss out on the Sale-a-bration free product if your order is just a little short!
Should you have any questions or need help before you close your order, please contact me at sjbeale@canadianstamper.com.
I hope you have enjoyed this post….
- Whenever you need crafting supplies, just CLICK HERE – You’ll be redirected to my Stampin’ Up! shopping page!
- Thank you for using my Current Host code XHQUPCPF when your order is under $200.00. All orders placed with me, will receive a gift from me as a thank you. I appreciate your support.
- Be inspired, CLICK HERE! to see even more crafting projects
- Shop the CLEARANCE RACK with discounts up to 60%
- Contact me to receive my Monthly Newsletter, CLICK HERE

Susan Beale
Independent Stampin’ Up! Demonstrator
Ontario Canada
Email: sjbeale@canadianstamper.com
- Website: https://www.canadianstamper.com
- Facebook: https:facebook.com/canadianstamper
- Instagram: http://www.instagram.com/canadianstamper


