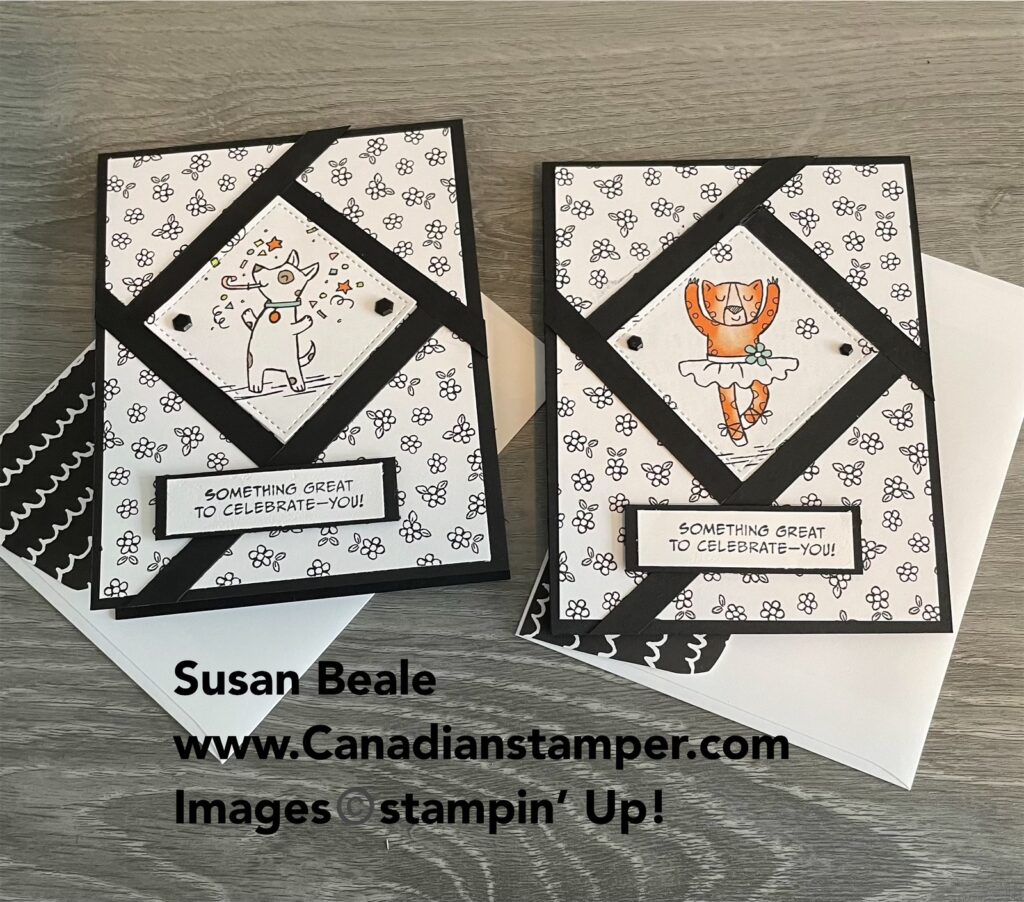
[vc_row][vc_column][vc_column_text]I have seen a lot of “Fractured Cards” made recently from fellow crafters. Each one is so unique yet the concept is basically the same for each card. So today I thought I would jump on the band wagon and give it a try as well. I really love how it looks and it’s so easy to make up.
You will need the following;
Basic Black Card Stock
- 4 1/4″ x 8 1/2″ (card base)
- Strips – 3/8″ wide and approx 4-5″ in length (cut long strips and trim later)
Basic White Card Stock
- 4″ x 5 1/4″ (inside of card)
Zoo Crew Designer Series Paper
- Card front – 4″ x 5 1/4″
- Image to cut out with Dies
I also used the Zany Zoo Stamp set for my greetings and the Stitched Shapes Dies (retired)
To make up your card.
Using the third largest Square die (approximately 2 1/4″ x 2 1/4″), cut out one of the adorable images from the Zoo Crew Designer Series Paper, making sure the cut is actually diamond shaped.There are lots of images to choose from however not all with fit in the square die so choose carefully.
Fold your Card base in half and burnish with your bone folder to give it a good crease then adhere the Designer Series paper to the card front.
Center your Square (or diamond shape cut out) on the front of the card just slightly above the middle of the card and adhere with dimensional’s.
Tip: If you don’t have a square die, you can cut a square piece of Basic White and stamp and colour your image insteadMake sure you line up the square so it is actually diamond shaped when placing it over the image before cutting (ask me how I know)
Place your strips around the Diamond centre making sure the end bump up against each other (no gaps) and the strips are long enough to run off the card. Don’t worry if they are too long. Once you are happy with how they look, adhere to the card front using Multipurpose Glue to give you a little wiggle room while lining them up. Once all the strips have been adhered, turn your card front over and trim away the overlapping strips so they are flush with the card edges.
I then stamped the cute Racoon holding the balloons, coloured the balloons with blender pens and stamped my Happy Birthday greeting. It was then adhered to the inside of my card (Sadly, I forgot to take a picture of the inside)
Product List
")
 Designer Series Paper")


Create dazzling traditional Christmas cards with the Home for the Holidays Paper Pumpkin Kit! Whether you want to send a few to your loved ones or fill your home with some extra special Christmas cheer, this kit has everything you need to make some sparkly, festive cards. Keep reading to learn more!
THIS KIT INCLUDES:
8 card bases (4 each of 2 designs)along with 8 coordinating envelopes
1 Real Red Stampin’ Spot
Beautifully detailed pre-cut pieces and a photopolymer stamp set for your greetings.
Bonus – You will also receive glitter glue which you can use on this kit and other projects for some added sparkle
Subscribe before Oct 10 to receive this kit, just CLICK HERE! As an added perk all subscribers can purchase kit refills, past kits and more.
Have you checked the Online Exclusives lately?
September 6, five new Designer Series paper packages became available and they are gorgeous.
I especially like the Silver and Gold adhesive backed Glitter paper. Yes, I said adhesive backed. No more fussing with glue on the smaller, detailed cuts to accent your cards and projects. My order is already on it’s way!
So check it out but don’t wait, some exclusives will be refilled while others are while supplies last and with Christmas coming (yes, I know….) they will sell out fast!
[/vc_column_text][/vc_column][/vc_row][vc_row][vc_column][html_block id=”11645″][/vc_column][/vc_row][vc_row][vc_column][vc_separator color=”black” wd_hide_on_desktop=”no” wd_hide_on_tablet=”no” wd_hide_on_mobile=”no”][/vc_column][/vc_row][vc_row][vc_column][html_block id=”11646″][/vc_column][/vc_row]
Leave a Reply