Have you ever sat down to craft and come up with a blank? Similar to a writer’s block, we all experience crafting blocks where we just cannot come up with an idea, despite having all your stamps, ink and assorted crafting supplies ready to go. A great way to overcome that is to have templates and card layouts on hand to refer to. You can also gather inspiration from the beautiful Stampin’ Up! catalogue which is filled with pictures of cards you can make and all the beautiful stamps available. Please visit my online store to be inspired, just click here Each stamp you see, will have a couple of pictures as examples of how to use that stamp. If you decide to make a purchase, please use my March Host code – 3JTVASQ6 and you will be automatically be entered into my monthly draw
Here’s a suggestion; Whenever you make up a card, take a piece of copy paper and draw out a layout of the card. As you can see from my picture, I don’t spend a lot of time making it pretty, as it’s meant for my reference only. It’s just hand drawn with a few descriptive words and the measurements on the back. The next time I want to make a similar card, I have a reference and I know that just by changing up the colours, the flowers and the sentiments, my next card will look completely different.


You will very quickly assemble a reference file for future card layouts that you can use over and over again. We all know that a card will take a completely different look when paper, ink or stamps are used. Tip: Set up a a file to store all your templates and layouts. Whether they are card layouts, stamparatus template or one sheet wonders you will have them all for easy reference if they are all stored in a single file.
Another great way to get inspired is with a One Sheet Wonder template. You can make one up to use over and over again. It’s a great way to make up bulk cards easily, such as Christmas cards but the cards can be for any occasion as well. Below you will see the template I made up, the cut paper and all 11 cards I made by only using the 12″ x 12″ Designer Series paper. By cutting up your paper, it will allow you to use up both sides of the paper to extend your cards with various designs. A word of warning though, take a good look at both sides of the paper. In my example below I love the flowered paper but didn’t look at the back. It’s striped and I am not a fan of stripes. However I still went ahead and made up all the cards but only used one striped background, preferring to stick to the flowered DSP


By mixing up my card stock I made each look unique just by changing up the sentiments, ribbon and embellishments. In this example, I only used Rococo Rose and Night of Navy as card bases, which matched up beautifully with the flowers, however in hindsight, I could have also used Pear Pizazz to bring out the green a little as well. Oh well…. next time!

Sometimes, you see a large piece of Designer Series Paper and cannot imagine what to use it for. The picture below was one of those for me. I wasn’t too impressed with that particular design which was included as part of the package.However, once I cut it into a card size piece it’s not so intimidating. Even as I type this, my thoughts are flowing as to what I can use for. So I recommend that you don’t just look at it, cut it up in whatever way works best for you so when you go to craft, you have it all ready and just waiting to be used. You could cut it up in 4″ x 12″ strips or 4″ x 6″ pieces or even 6″ x 6″ squares. Whatever you decide, it will save space and just by having smaller pieces, it will inspire you to craft with it.


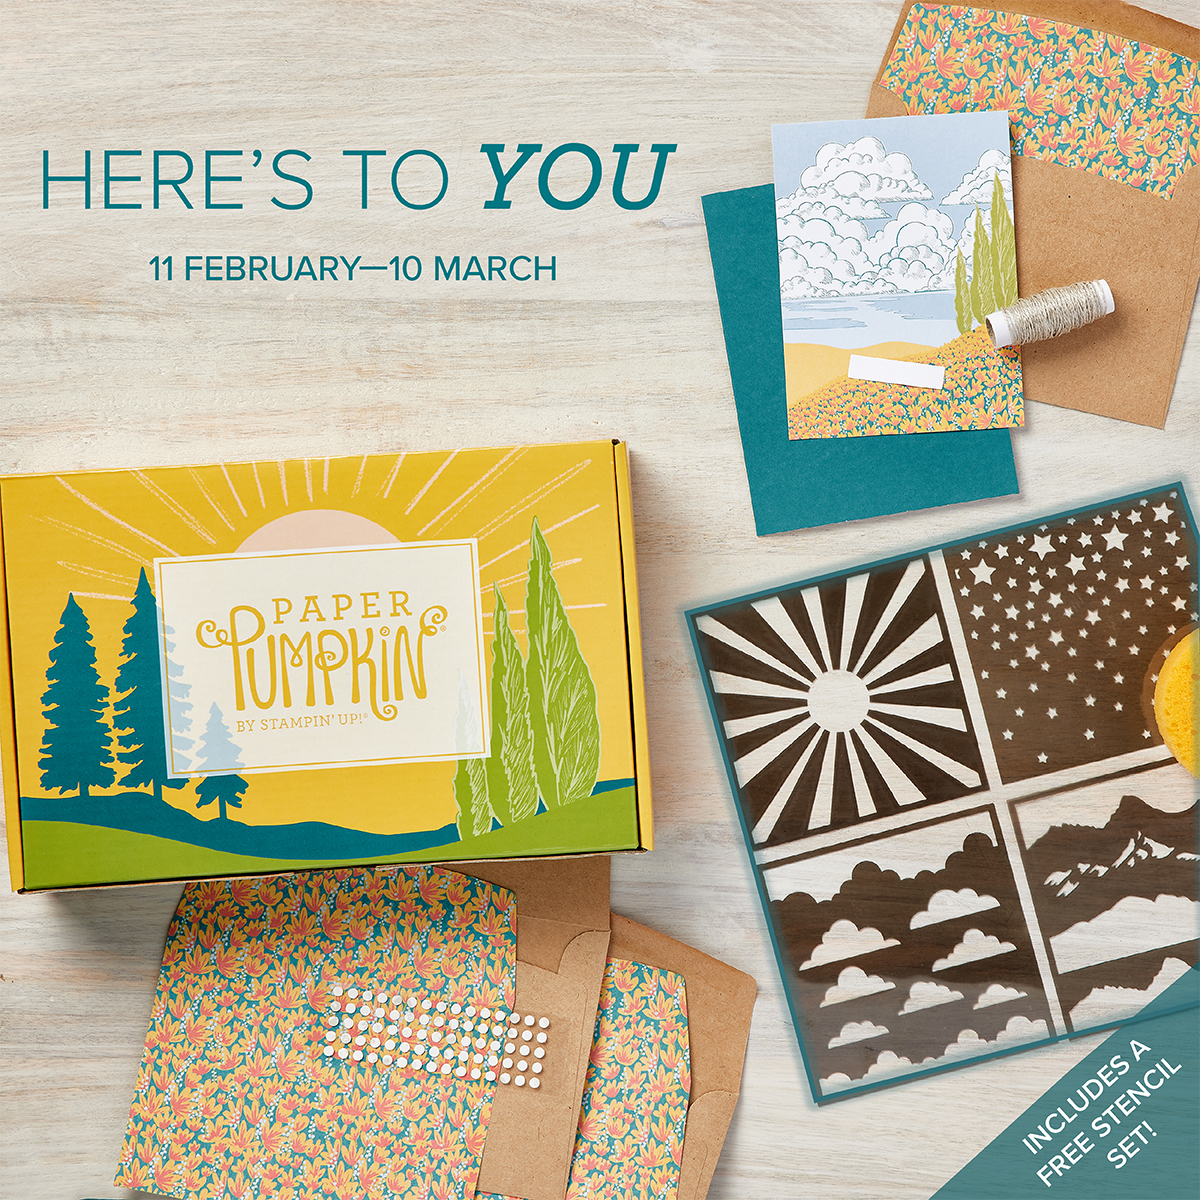
There is just one day left to subscribe for the March Paper Pumpkin kit. Each month is inspired with a different theme. This month’s “Here’s to You” Paper Pumpkin Kit contains enough elements and embellishments to create eight cards and coordinating envelopes. With fields of wildflowers, scenery of mountain majesty, and sentiments of celebration, you’ll let your loved ones know that the views from the hilltop are always worth the hike! As an added bonus, our free stencils and a stamping sponge are included for added inspiration and it all arrives in a cute and collectible box
To receive this kit, click here to subscribe by March 10th
As always, I hope you have enjoyed this post and I also hope that you have been inspired. I welcome your feedback so please leave me a comment or if you have any questions, please contact me.
Have a wonderful day!
Sue
Leave a Reply